| << Active Directory PowerShell Module Users and Groups Migration Commands Generator | MSSQL to Cosmos DB Migrator and Containerized Blazor App Azure DevOps CI Deployment >> |
Azure DevOps CI Ansible VPN Deployment Between Virtual Network Gateway and Cisco ASA
Introduction
This blog will go over the details of the Ansible project and explain how to automatically deploy a VPN tunnel between an Azure Virtual Network Gateway (VNETGW) and a Cisco ASA 5506 firewall device on premises. To allow secure access to the LAN interface of the ASA firewall, the DevOps CI Pipeline executes on self-hosted agent running on an Ubuntu server located on premises. Also, to avoid having to write any sensitive information on the playbooks, the process relies on an Azure KeyVault that stores the secrets required by the project.
First, I will describe how the setup the self-hosted agent. Then, I will explain how to setup the KeyVault for the project, and how Ansible access KeyVault secrets. Lastly, I will go over how the playbook queries for random IPs created at run time, which are required for proper configuration of the ASA Firewall.
The playbooks for the DevOps Pipeline can be found in the public GitHub repository below:
Better-Computing-Consulting/azure-devops-ci-ansible-vpn-deployment: Automatic deployment of both ends of a VPN tunnel using Ansible, Azure DevOps CI and Azure KeyVault (github.com)
This video shows the entire process execution:
Preparation of the self-hosted agent
To avoid having to allow access to the external interface of the ASA firewall, the pipeline executes on a self-hosted agent, that is, on a server running on premises. By default, Azure Pipelines run on Microsoft-provided virtual machines running on the cloud. To be able to run the playbook on a cloud agent, we would need to allow SSH access to the external interface of the ASA device. For the self-hosted agent, on the other hand, we do not need to open any ports on our firewall. The pipeline jobs are not initiated by incoming connections from the internet, instead the agent running on premises constantly checks for new jobs by starting outgoing connections to port 443 of Azure DevOps servers. Thus, for the self-hosted agent to work we only need to allow out-going port 443 connections, which are allowed by default.
Running the agent on premises has the added benefit of persistent configuration of the server. When the pipeline relies on a Microsoft-provided cloud Virtual Machine, all the software required for the playbook, and Ansible itself, must be installed before the playbook runs. Also, the credentials required to deploy resources into the Azure infrastructure have to be provided in the Azure DevOps project before the pipeline runs. With a self-hosted agent all software installations and configurations, including Azure credentials, persist in the server running the agent after reboots and can be reused for different pipelines.
To prepare the server that will run the self-hosted agent on a fresh install of Ubuntu 20.04, run these commands to install Ansible and the collections required by the playbooks:
sudo apt update
sudo apt upgrade
sudo apt install python3-pip
sudo pip3 install --upgrade pip
sudo pip3 install ansible
wget https://raw.githubusercontent.com/ansible-collections/azure/dev/requirements-azure.txt
pip install -r requirements-azure.txt
ansible-galaxy collection install azure.azcollection
ansible-galaxy collection install cisco.asa
It is not necessary for the playbooks, but it is very useful to also install the Azure Command-Line Interface (CLI) on the server. Run these commands to install it:
sudo apt-get update
sudo apt-get install ca-certificates curl apt-transport-https lsb-release gnupg
curl -sL https://packages.microsoft.com/keys/microsoft.asc |
    gpg --dearmor |
    sudo tee /etc/apt/trusted.gpg.d/microsoft.gpg > /dev/null
AZ_REPO=$(lsb_release -cs)
echo "deb [arch=amd64] https://packages.microsoft.com/repos/azure-cli/ $AZ_REPO main" |
    sudo tee /etc/apt/sources.list.d/azure-cli.list
sudo apt-get update
sudo apt-get install azure-cli
Next, we setup Azure access for Ansible by storing credentials in the ~/.azure/credentials file of the user running the Azure Pipelines Agent.
The credentials file has this format:
[default]
subscription_id=xxx
client_id=xxx
secret=xxx
tenant=xxx
The only time the service account secret is displayed is during the service principal account creation with the command:
az ad sp create-for-rbac --name service-account-name-here
After the service principal account is created to get a new password use the command:
az ad sp create-for-rbac --name service-account-name-here --query password -o tsv
Once you have your service account password, you can generate the ~/.azure/credentials file with these commands:
mkdir ~/.azure
echo "[default]" > ~/.azure/credentials
echo "subscription_id=$(az account show --query '{subscriptionid:id}' -o tsv)" >> ~/.azure/credentials
echo "client_id=$(az ad sp list --display-name ansible-service-name-here --query '{clientId:[0].appId}' -o tsv)" >> ~/.azure/credentials
echo "secret=service-principal-password-here" >> ~/.azure/credentials
echo "tenant=$(az account show --query '{tenantId:tenantId}' -o tsv)" >> ~/.azure/credentials
After software and credentials are ready in the agent computer, we need to install the Azure DevOps agent on the server.
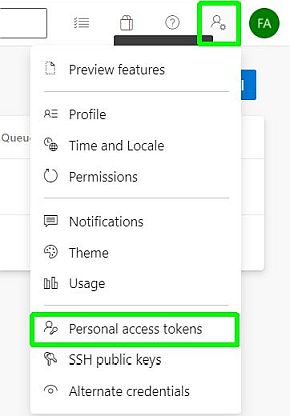
First, you need to create the agent package on Azure DevOps. To do this sign into your Azure DevOps Organization with an Administrator account, click on the User Settings button on the upper-right hand corner, and click on Personal Access Token.
https://dev.azure.com/your-organization-here

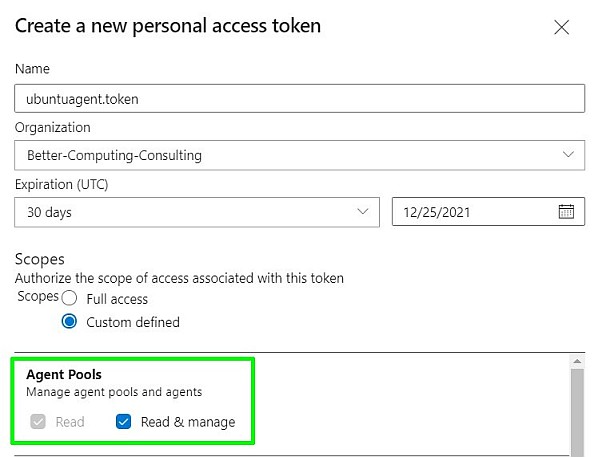
Then click on New Token. Select Show all scopes at the bottom of the Create a new personal access token window to see the complete list of scopes. For the scope select Agent Pools (read, manage) and make sure all the other boxes are cleared. You will need the token during agent configuration for the on-premises server, and this is the only time you will see, so save it.

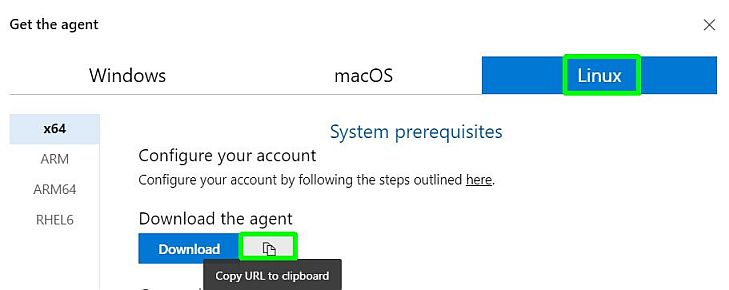
Next, you need to get the agent's download URL to configure it in the Ubuntu server. To do this on Azure DevOps go to your Organization Settings | Agent Pools | Default and click on New agent

On the Get the agent window select Linux and copy the download URL to the clipboard.

Lastly, download and setup the agent on the Ubuntu server with these commands:
~/$ wget https://vstsagentpackage.azureedge.net/agent/2.195.0/vsts-agent-linux-x64-2.195.0.tar.gz
(You should paste the address you copied in the previous step here to make sure you get the right client.)
~/$ mkdir myagent && cd myagent
~/myagent$ tar zxvf ~/vsts-agent-linux-x64-2.195.0.tar.gz
~/myagent$ ./config.sh
The setup process will prompt you to accept the license agreement, the server URL, which is the path to your Azure DevOps organization, and the access token you obtained in the previous step. After you configure the agent, you can manually run it with this command:
~/myagent$ ./run.sh
This is the output that configuring and running the agent produced in my Ubuntu server:
vpndemo@ubuntuagent1:~/myagent$ ./config.sh
  ___                      ______ _            _ _
 / _ \                     | ___ (_)          | (_)
/ /_\ \_____   _ _ __ ___  | |_/ /_ _ __   ___| |_ _ __   ___  ___
|  _  |_  / | | | '__/ _ \ |  __/| | '_ \ / _ \ | | '_ \ / _ \/ __|
| | | |/ /| |_| | | |  __/ | |   | | |_) |  __/ | | | | |  __/\__ \
\_| |_/___|\__,_|_|  \___| \_|   |_| .__/ \___|_|_|_| |_|\___||___/
                                   | |
        agent v2.195.0             |_|          (commit 805596a)

>> End User License Agreements:

Building sources from a TFVC repository requires accepting the Team Explorer Everywhere End User License Agreement. This step is not required for building sources from Git repositories.

A copy of the Team Explorer Everywhere license agreement can be found at:
/home/vpndemo/myagent/externals/tee/license.html

Enter (Y/N) Accept the Team Explorer Everywhere license agreement now? (press enter for N) > y

>> Connect:

Enter server URL > https://dev.azure.com/Better-Computing-Consulting/
Enter authentication type (press enter for PAT) >
Enter personal access token > ****************************************************
Connecting to server ...

>> Register Agent:

Enter agent pool (press enter for default) >
Enter agent name (press enter for ubuntuagent1) >
Scanning for tool capabilities.
Connecting to the server.
Successfully added the agent
Testing agent connection.
Enter work folder (press enter for _work) >
2021-11-17 17:47:25Z: Settings Saved.
vpndemo@ubuntuagent1:~/myagent$ ./run.sh
Scanning for tool capabilities.
Connecting to the server.
2021-11-17 17:56:45Z: Listening for Jobs
Setting up Azure KeyVault
To avoid writing usernames, passwords or the VPN shared key, the playbook retrieves these secrets from an Azure KeyVault. The KeyVault used in the project also restricts access to one public IP and specifies a user with read-only access and another with full access.
You can use the button below to deploy a KeyVault with the same properties as the one the playbook uses. The KeyVault deployment process requires the objectid of each user. The template used by the button is included in the repository, KeyVault.json.
To get the objectid for the read-only service principal account run this command:
az ad sp list --display-name ansible-service-name-here | grep objectId
To get the objectid for the admin user account run this command:
az ad user list --upn admin-user@your-domain-here_com | grep objectId
To get public IP of the server running the Azure Pipelines Agent run this command:
dig +short myip.opendns.com @resolver1.opendns.com
At this point, with the self-hosted agent running and the KeyVault deployed, you can setup the Azure DevOps project and setup the Pipeline pointing to your clone of the repository. The address of the repository and a video showing how to setup the project is included at the beginning of this blog.
Obtaining and using the KeyVault secrets in the playbook
The playbook relies on four secrets stored in the KeyVault: ASAUserName, ASAUserPassword, EnablePassword, and VPNSharedKey.
The first step of the playbook gets these secrets from the KeyVault and stores them on the secrets variable. See lines 24-33 of vpnsecure.yml.
24 25 26 27 28 29 30 31 32 33 |
    - name: Get project secret variables from KeyVault
      azure.azcollection.azure_rm_keyvaultsecret_info:
        vault_uri: "{{ keyvaulturl }}"
        name: "{{ item }}"
      loop:
        - "ASAUserName"
        - "ASAUserPassword"
        - "EnablePassword"
        - "VPNSharedKey"
      register: secrets
|
The results are stored as a zero-based array of responses, so the next step goes through the responses in order to setup the CLI variable, which will be used to login to the ASA device, and VPN Shared Key that will be used when setting up both ends of the VPN Tunnel.
35 36 37 38 39 40 41 42 43 |
    - name: Set asa cli and vpn shared key variables
      set_fact:
        cli:
          host: "{{ inventory_hostname }}"
          authorize: yes
          username: "{{ secrets.results[0]['secrets'][0]['secret'] }}"
          password: "{{ secrets.results[1]['secrets'][0]['secret'] }}"
          auth_pass: "{{ secrets.results[2]['secrets'][0]['secret'] }}"
        vpnsharedkey: "{{ secrets.results[3]['secrets'][0]['secret'] }}"
|
Handling needed variables produced at runtime
There are two properties from the VNETGW that are needed for the configuration of the ASA firewall that are not known until Gateway is deployed: its public IP address and the address of the BGP peer. When deploying the VNETGW via Azure command line interface, you can specify the BGP address, but Ansible's azure_rm_virtualnetworkgateway will not allow you to specify it. Also, the same module will fail if you try to use a static pubic IP address. The IP address you use for module must be dynamic, so we do not know the pubic IP address of Azure's end of the tunnel until after the VNETGW is created.
Thus, these properties must be captured after the VNETGW is deployed. Further, the return values of the VNETGW deployment do not include these addresses and Ansible's Azure collection does not include a module to get information about VNETGWs specifically. Instead, we must rely on the azure_rm_resource_info module, which allows us to get information on any resource based on Provider Name and Resource Type via API request. We request the VNETGW information in lines 90-7 of vpnsecure.yml
90 91 92 93 94 95 96 97 |
    - name: Get virtual network gateway info via API request
      azure_rm_resource_info:
        resource_group: "{{ rg }}"
        provider: network
        resource_type: virtualNetworkGateways
        resource_name: "{{ vnetgw }}"
        api_version: "2020-11-01"
      register: vnetgwvar
|
And then we set the variables on lines 99-102.
99 100 101 102 |
    - name: Set bgpPeeringAddress and tunnelIpAddresses public ip variables
      set_fact:
        azvpnpeeraddress: "{{ vnetgwvar['response'][0]['properties']['bgpSettings']['bgpPeeringAddress'] }}"
        azvpnpubip: "{{ vnetgwvar['response'][0]['properties']['bgpSettings']['bgpPeeringAddresses'][0]['tunnelIpAddresses'][0] }}"
|
Thank you for reading.
Federico Canton
IT Consultant
Better Computing Consulting
| << Active Directory PowerShell Module Users and Groups Migration Commands Generator | MSSQL to Cosmos DB Migrator and Containerized Blazor App Azure DevOps CI Deployment >> |